OPERATOR'S MANUAL
A Manual compiled by the makers of the Long Branch Training Rifle
in order that you may
operate and care for
your rifle properly, and from it obtain
the full benefits of the purpose
for which it is intended.
SMALL ARMS LIMITED
CONTENTS
Page
INTRODUCTION .............................. 3
LONG BRANCH TRAINING RIFLE:
Bolt Action ................................. 4
Trigger
Pull ................................ 4
Trigger
Release ........................... 5
Charger
Action ........................... 5
Sights ........................................ 6
Sight
Aligning ............................ 7
target:
target
Stand .............................. 7
TARGETS ........................ :............ 8
ILLUSTRATION ............ (Centre Piece)
STANDARD EQUIPMENT ................ 8
INTRODUCTION
The Long Branch Training Rifle is an effective target practice rifle that
resembles the service rifles but is less expensive to manufacture and
operate.
The purpose of the Training Rifle is to reduce training time and cost by covering a number of steps in the training programme before the final stage of actual experience on the firing range.
These
steps are covered effectively without expenditure of ammunition and without the necessity of trips to the range. The number of men who can be given this
preliminary training is limited
only by the number of training rifles available. Instruction can be given in a small room or in the
open-anywhere that the stand can
be placed in a perpendicular position.
The steps covered in training are as follows:(1) Holding
(2)
Aiming Position
(3) Sighting
(4) Trigger Pressure
(5) Shoulder Pressure
The shooter's aim is
registered by needles that dart from the muzzle and pierce a paper target
held on a stand directly in front of the
rifle. Connecting links are used to control the relative distance between the rifle and the
stand during operation.
Besides
resembling the standard service rifle in operation, appearance, weight and
balance, the training rifle emphasises additional advantages
for the user.
To
insure correct holding, butt pressure must be maintained in order to have the rifle operate.
Tilting,
flinching and breathing during the firing are indicated by the type of puncture made in the target. Such
TARGETS can be used as permanent
records of the operator's performance.
-3-
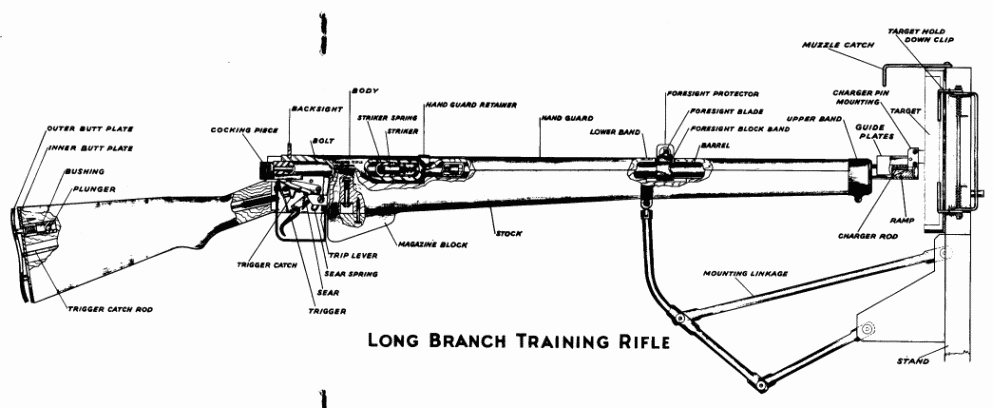
LONG BRANCH TRAINING RIFLE
BOLT ACTION
Outwardly, the training rifle operates in the same manner as
the conventional bolt action rifle. For recocking,
the bolt must be unlocked and drawn to the extreme rear position. This action
is designed to reproduce the conditions of ejecting and reloading on rifles
where ammunition is actually used.
When the training rifle is cocked, the top arm of the sear
engages the front edge of the cocking piece and holds it in this position
ready for firing. However, before the sear can rotate sufficiently to do
this, the lower projection of the trip lever must fit into the corresponding
slot in the lower sear arm. Movement of the bolt to the end of the ejection
stroke brings the top of the trip lever back with it and the lower end into
position with the sear, which facilitates cocking and insures complete
manipulation of the bolt before firing.
The bolt to be removed must
be withdrawn approximately to the half-way position so that a circumferential
slot in the bolt is opposite the trip lever at which point the bolt may be
rotated clockwise through 90 degrees and then withdrawn from the body. The
bolt may be replaced by reversing this procedure.
TRIGGER
PULL
In the action of firing the rifle, the trigger movement
causes the sear to rotate and slide off the cocking piece which is then free
to move ahead. When the trigger is pulled, two distinct finger pressures will
be noticed. These are caused by two trigger lobes which bear on the sear at different
intervals. The second and heavier pull occurs when the upper lobe is brought
into contact. Immediately after the second pull is felt the cocking piece
has been released.
-4-
When the trigger is allowed
to return to its free position after firing, it is automatically locked at
the top by the trigger catch. The rifle cannot be fired again until the
trigger is released by pressure on the butt plate.
TRIGGER RELEASE
Shoulder pressure must be maintained to operate the
training rifle. Pressure on the outer butt plate forces the catch rod against
the trigger catch causing it to lift at the front and giving the trigger a
clear path in which to rotate.
The outer plate is riveted
to two plungers mounted in bushings in the butt. The plungers, bushings and
springs are held in place by the inner plate fixed to the end of the butt by
two wood screws. These are accessible only through two holes in the outer
plate.
CHARGER ACTION
Upon firing, the striker with the cocking piece is
moved rapidly ahead by the striker spring to strike the end of the charger
rod. From the impact, the charger rod receives sufficient momentum to enable
it to complete its relatively longer stroke. In order to have the firing
cycle act quickly, the charger rod spring returns the charger rod to its normal
position immediately upon completion of the forward stroke.
The striker is assembled from the front of the bolt
and is threaded and staked into the cocking piece.
The charger rod goes into
the barrel from the back and threads into the charger pin mounting. For this
purpose the head on the back end of the charger rod is slotted for a screw
driver. The charger rod rides in a bronze bushing brazed in the barrel
slightly in front of the charger rod head.
-5-
All parts of the charger mechanism are designed to run freely. Care must be exercised to maintain this condition.
As the charger rod advances
the charger pin mounting rises up and travels forward with the upper pin
striking the target on the sight line. The second pin strikes below this and
registers another mark which tells the angular position of the rifle at the
time of firing.
The pins are identical to
phonograph needles (Victor Soft-Tone). They can be replaced by loosening the
screw in the side of the mounting. Do not attempt to straighten or bend the
needles while they are in the mounting. This will result in damage to the
freely working charger mechanism.
SIGHTS
To reproduce actual shooting conditions and give the
impression of shooting over a longer range, the training rifle foresight is
mounted midway on the barrel. In other respects the sights are the same as
those of a conventional weapon.
The foresight consists of a blade, a block band and a
protector. The block band is permanently fixed to the barrel by brazing and
consequently its position is determined by the pin fixing the barrel to the
body. The blade fits the dove-tail cut on the top of the block band and is
located in its correct lateral position by a small prick punch at its base.
The protector is held on by a screw going completely through the block band
and threading into the opposite side of the protector. The large holes on
either side are to permit easy adjustment or removal of the blade.
The backsight plate is snugly
fitted and staked in a slot in the body. It should not be moved in making
normal sight adjustments.
-6
SIGHT ALIGNMENT
Sight aligning is done by
moving the charger pin mounting to the extreme forward position and having
the sights aligned with the white spot on the back end of the upper pin.
A piece of soft wire such
as a paper clip bent around the mounting and hooking over the muzzle will
hold the mounting forward.
All sight adjustments are made to the foresight. Six
standard service blades are available for change of height.
Windage adjustments are made by sliding the blade in the block band dove-tail and
locking as described in "Sights."
TARGET
TARGET STAND
The target stand has
connecting links that maintain a constant distance between the rifle muzzle
and the target during operation. As the rifle is moved about the target, it
travels vertically in a straight line and curves horizontally to follow the
contour of the target. For best results, the axis of the rifle should always
be approximately perpendicular to the target frame.
The stand is adjustable
from the base within a six inch range. The base itself can be folded up when
not in use. The connecting mechanism can be removed by drawing the pin that
holds the triangular block to the stand.
To prevent damage to the
rifle or the stand when not in use, the rifle should always be rested on the
hook provided at the top of the target. To remove the rifle completely from
the connecting links it must be tilted to the left and moved straight to the
right.
-7-
TARGETS
No special TARGETS
are
supplied with the Long Branch Training
Rifle. The combination of pins and
clips on the frame allow the use of almost any standard paper target of
approximately similar dimensions.
STANDARD EQUIPMENT
Combination Screw Driver
Operator's
Manual
Return to: TOP of PAGE
See this website's Raison d'être