S.A.T pamphlet for the Enfield designed BOYS ANTI-TANK RIFLE
Small Arms Training (SAT) Pamphlet No.5 1942
This 1937/41 edition is also available as a flip-book original facsimile
See also the OPERATING MANUAL the RANGE COURSE the ARMOURERS' INSTRUCTIONS
the ILLUSTRATED PARTS - back to BOYS A.T.R.

Small Arms Training
Volume I, Pamphlet No. 5
Anti-Tank Rifle
1942
(This pamphlet supersedes the 1937 edition and that
reprinted with Amendments (No. 1), 1939.)
Crown Copyright Reserved
By Command of the Army Council,

DISTRIBUTION
............................................................................SCALE
All Arms (including Training Establishments) ... ... D (a)
0.C.T.Us. ... ... ... ... ... ... IV
S.A.S.—Hythe wing ... ... ... ... ... 140
S.A.S.—Netheravon wing ... ... ... 50
CONTENTS
.....................................................................................PAGE
General... ... ... ... ... ... ... ... ... 1
Lesson 1. Cleaning, loading and unloading ... ... 2
Lesson 2. Sight setting, aiming and firing ... ... ... 5
Section for instructors (handling) ... ... ... 9
Lesson 3. Handling ... ... ... ... ... 10
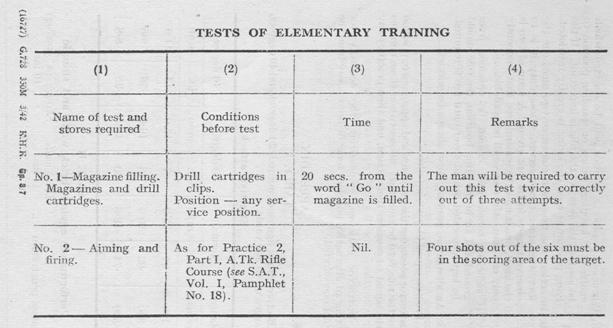
Tests of elementary training ... ... ... ... ... 12
GENERAL
- 1. Object
The sole object of weapon training is to teach all ranks the most efficient way of handling their weapons in order to kill the enemy. Instructors will always bear this fact in mind, and will continually impress. it upon those whom they instruct.
Weight, 36 lb. ; calibre, •55 in. ; weight of magazine containing 5 rounds, 2 lb. 7 oz. ; total length, 5 ft. 4 .in.
3. Penetration of the anti-tank rifle
Although the bullet will penetrate the armour of light A.F.Vs. up to 500 yards, and inflict casualties on the crew, fire should be withheld until the range is well within 300 yards. The angle of impact of the anti-tank rifle bullet on the armour has a greater influence than the range at which it is fired. For example, while the penetrative power is only 10 per cent. less at 300 yards than at 100 yards, it is 25 per cent. less when the angle of impact is over 20 degrees, and 50 per cent. less at over 40 degrees at the Lett r range. (For further details see the Appendix.) The exact moment of fire must therefore be decided by the firer's determination to hit the selected part of the tank fair and square, rather than by range only. As a general rule the •55-in. anti-tank rifle bullet will penetrate all parts of the Pz. Kw. Mk. I light tank, and the sides and rear of the hull and turret of the Pz. Kw. Mk. II light tank, at 250 yards range at an angle of impact of 20 degrees or less. It does not penetrate the armour of heavier tanks except in certain points such as the rear of the turret and cupola of the Pz. Kw. Mk. IV at very short range. When shooting at German tanks of the Pz. Kw. Mk. III and larger tanks fire should be aimed, if it is possible, at vulnerable points, especially on the junction point of turret and hull and gun mantle, to cause burring over of working surfaces and thus produce jamming.
- 4. Recruit Instruction
Instructors must appreciate that, while the lessons are designed to be taught in one period, more time will be necessary in order to give recruits sufficient practice to obtain efficiency. There are so many similarities between the anti-tank rifle
and other weapons that a soldier should Ix capable of handling it with a small amount of instruction. Anti-tank rifles are not specialist weapon, and all ranks will be taught to fire them. Men Will be trained to aiim at close range's, at the vulnerable parts of tanks and armoured vehicles, for which reason it is important that training in the vulnerable parts of enemy A.F.Vs. is included as a subject in the training of the soldier.
- 5. Trained soldier instruction
The trained soldier should be practised in handling this weapon from all types of cover and firing the weapon at moving targets. Valuable practice may be given by means of reduced scale skooting in a miniature range using the •22-in. rifle attachment (see S.A.T., Vol. I, Pamphlet 18).
- 6. Dress
Battle order will be worn for all lessons.
- 7. Improvisation
A halfpenny will act as a magazine platform depressor.
Before every lesson the instructor will inspect the anti-tank rifle, magazines, and drill cartridges and utility pouches.
As the anti-tank rifle has a range almost double that of the rifle, it is unsafe to fire full charge ammunition on classification ranges, apart from a few rounds at short distances into the stop butt to accustom men to the effect of such fire, as described in S.A.T., Vol. I, Pamphlet 18, except where danger areas have been extended and passed as safe.
LESSON 1.—CLEANING, LOADING AND UNLOADING
Stores :‑
Anti-tank rifle ; magazines in utility pouches ; drill cartridges ; cleaning materials in breech cover ; combination tool.
Safety precautions—see General, para. 8. The breech cover will be on the rifle.
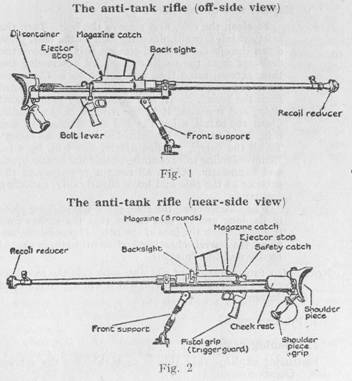
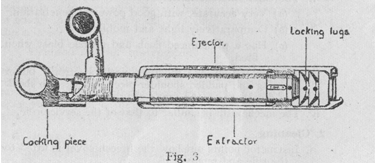
Each part of the rifle should be named as handled (see Figs. 1, 2, 3).
1. Explain
i. The anti-tank rifle is a platoon weapon which affords a means of protection against light A.F.Vs. Although the bullet will penetrate such armour up to 500 yards and inflict casualties on the crew, fire should be withheld until the range is well within 300 yards. A well-trained man should be able to fire about 9 rounds a minute.
ii. The chief characteristics are :‑(a) Very accurate, with good power of penetration.
(b) Comparatively light and mobile.
(c) Has a pronounced flash and muzzle blast when fired.
iii. The recoil reducer, together with a strong buffer spring and padded shoulder-piece, reduces the shock of discharge on the firer's shoulder.
iv. The mechanism is similar to that of the service rifle.
2. Cleaning
i. Instructor points out how the breech cover is fitted to
rifles and removes it.
ii. Explain and demonstrate :—
To clean the rifle, first remove the bolt. Turn the safety catch forward, draw the bolt to the rear, press down the ejector stop and remove bolt. Remove the deflector from the recoil reducer by unscrewing the three screws, using the combination tool. Clean the recoil reducer, leaving. slightly oily. Remove the rod from the breech cover, and assemble by pulling cord tight, and fastening it to the notches in the handle. Clean the barrel, using the rod and flannelette, size 6 in. by 4 in. Use the wire brush when necessary. To oil the barrel, use flannelette, size 4 in. by 4 in. Remove fouling from chamber, using the bristle brush and flannelette. Clean all remaining parts and the exterior of the rifle and leave slightly oily, including magazines.
When assembling the rifle, place the cocking piece in the long groove, and ensure that the striker protrudes through the face of the bolt. If possible before firing the barrel, chamber and recoil reducer should be dry and free from oil.
NOTE.—On future models of the anti-tank rifle the recoil reducer may be of modified form, which will not be removed for cleaning,
3. Practise squad.
4. Cleaning after gas
Instructor explains that this is as taught for the service rifle. Question Squad.
5. Magazine filling
Explain and demonstrate :—
i. To fill.—Hold the magazine in one hand, resting it on the knee or on a solid surface. Press down the platform and insert the base of the cartridge under the magazine lips. Push the cartridge into the magazine. Continue this action until the magazine is filled.
ii. To empty.—Push each round forward with the side of a bullet and remove.
6. Practise squad.
7. Loading and unloading
Explain and demonstrate
To load.—Lie down with the body straight behind the rifle. Turn the safety catch over to the front and place the magazine on., forward portion first. Open and close the breech, taking care that the bolt lever is fully down. Apply the safety catch. Place the left hand on the shoulder-piece grip and the right hand on the pistol grip with the forefinger outside the trigger guard.
ii, To unload.—Turn the safety catch over to the front ; press the magazine catch with the palm of the hand and remove the magazine. Open and close the breech, ensuring that bolt lever is fully down. Press the trigger. Apply the safety catch, and stand up.
8. Practise squad.
LESSON 2.--SIGHT SETTING, AIMING AND
FIRING
Instructor's Notes
This lesson will be taught behind cover, which enables the standing, sitting or kneeling position to be used. Practice should also be given in the lying position for use in emergency. When dealing with para. 4 of the lesson, use should be made of any available moving traffic.
Stores :—
Anti-tank rifle ; magazines in utility pouches ; drill cartridges ; aiming diagrams ; A.F. V. targets.
Safety precautions—see General, para. 8,
1. Sight setting
Explain that the body of the backsight is marked on the left " 300 " and on the right " 500 ".
To set the backsight :—
For 300 yards turn the lever to the left. For 500 yards turn the lever to the right.
(On future models there will be only one fixed backsight for use up to 300 yards.)

2. Aiming at moving targets
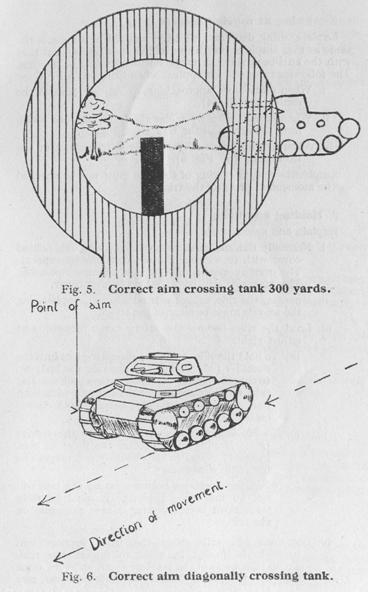
Explain, using diagrams, that the method, of aiming is the same as that employed with the L.M.G. (see Fig. 4), but that with the anti-tank rifle the targets will normally be moving. The following rules will be applied when firing at A.F.Vs. :—(i) When stationary, approaching, or retiring, aim at the centre (see Fig. 4).
(ii) When moving directly across the front, aim one width from the centre of the target (see Fig. 5).
(iii). When moving diagonally across the front, aim at the front edge (see Fig. 6).
Emphasize that the swing of the rifle must not be checked at the moment of pressing the trigger.
3. Holding and firing
Explain and demonstrate
(i) Normally the anti-tank rifle will be fired from behind cover with or without the use of the front support. The front support should be used whenever possible. The magazine will be placed on behind cover.
(ii) Mounting the rifle, using the front support, emphasizing the muzzle must be clear of the cover.
(iii). Load the rifle, leaving the safety catch forward, and adjust sight.
(a)To hold the rifle, bring the shoulder-piece into the shoulder (when lying—by drawing the body up to the rifle), lower the cheek to the cheek rest and take the first pressure. Hold firmly with both hands and aim as taught, keeping both elbows clear of cover if possible.
(b)To fire is exactly the same as with the service rifle. Having fired, declare the point of aim, instantly reload in the shoulder and prepare to fire again if necessary.
(c) When the magazine becomes empty the bolt will not go forward. Therefore it must be fully withdrawn before placing a new magazine on the rifle.
iv. Occasions will arise when the front support will have to be folded in order to mount the rifle. To do this, press in the retainer catch and turn front Support to the rear. When mounting on cover, rest
the rifle as near as possible to where it is normally supported, again keeping muzzle just clear of cover. Firing is exactly the same as when using the front support.
NOTES.--
1. To elevate or depress the barrel, rotate the sleeve on the front support.
2. On future models the front support may be modified in the form of a bipod.
4. Practise squad in mounting, holding, aiming and firing, with and without the front support.
HANDLING
(For the use of Instructors only)
1. When siting the anti-tank rifle the following factors must be considered :‑
(i) A field of fire which covers the task given, which may often be to cover an anti-tank or partial anti-tank obstacle, such as road blocks, wooded or marshy ground, rivers and anti-tank minefields, etc.
(ii)The desirability of shooting at enemy A.F.Vs. from the flanks or rear in order to avoid taking head-on shots where the armour is thickest.
(iii) The necessity to gain surprise, and the consequent
importance of a carefully concealed position.
2. Ammunition
The ammunition will normally be carried as follows :—
In the truck or corresponding vehicle--200 rounds for each anti-tank rifle. Of these, 160 rounds are in 16 bandoliers, each holding two clips of five rounds, and 40 rounds in eight magazines. These eight magazines go into action with the rifle..
3. Use of cover
(i). The firer should at all times make full use of cover for protection and concealment. Special attention must be given to the concealment of the muzzle on account of the flash. Muzzle blast must be considered.(ii) The position should always be examined from the point of view of the enemy. Normally, when an anti-tank rifleman has been given the arc or approaches for which he is responsible and the approximate position from which he will fire, he should leave the rifle in the best cover and reconnoitre alternative positions for it. He should decide how it is to be mounted at each place, bearing in mind that free use of the weapon is a factor of primary importance. Unless concealment is complete, both from air and ground, the rifle should be kept under cover near at hand, and mounted only when the necessity arises.
(iii) The anti-tank rifle is not easy to swing across a wide arc when being fired in the lying position. A position should, therefore, be chosen, when possible, from which it can be fired either sitting, kneeling, or standing, but no support behind the shoulder should be given owing to the shock of discharge. In the early stages this will mean placing it behind natural cover, which allows the firer to sit. At the earliest opportunity a slit trench should be dug. In an emergency the anti-tank rifle may have to be fired from the lying position.
NOTE.—On all ranges where anti-tank rifle practice is carried out slit trenches should be constructed so that the rifle may be fired from a standing position.
LESSON 3.—HANDLING
Instructor's Notes
Stores :—
Anti-tank rifle ; magazines in utility pouches ; rifles.
Safety precautions—see General, pare. 8.
Additionally inspect rifles, drill cartridges, pouches. Loosen slings.
This lesson should be carried out on ground affording various types of cover. The object of the lesson is to exercise men, working together in pairs, as they will do on service, in handling and siting the rifle.
1. Instructor explains :-‑
(i). Necessity for concealment of muzzle flash and limitation of blast.(ii) Whenever possible a position will be selected which enables the kneeling, sitting or standing position to be used, as the swing of the rifle is important. If the lying position is used the swing is greatly restricted.
(iii) In action, the team will consist of two men, one the firer, the other the observer, whose duty it is to observe targets in the arc given. A team of two is the ideal, but it must be remembered that frequently only one man—the firer—will be available.
(iv) If sufficient concealment cannot be obtained from ground and air in the firing position, the rifle should be kept concealed behind cover until fire is required.
(v) An alternative position must always be selected.
2. Practise squad in pairs as follows :‑
Instructor points out the arc of fire and approximate position where the rifle is to be mounted ; allows two or three minutes for the squad to consider their action, and then practises any pair.
3. Instructor criticizes, emphasizing the necessity for selecting an alternative position, some distance away from the original one selected.
APPENDIX.
TABLE I
Effective attack figures at normal, 20 degrees and 40 degrees,
at ranges up to 500 yards.
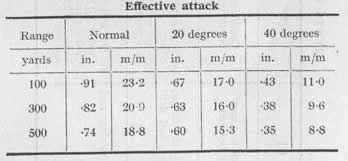
TABLE II
Performance against brick walls and shingle
Greatest penetration ... ...Brick walls - 14 ins. ... ... ... Shingle in sandbags - 10 ins.
Below in video clips, are three training films made by Walt Disney during the war, and a 1940 newsreel of the Boys Anti-Tank rifle in training use.
CLICK '>' ON EACH IMAGE BELOW TO START VIDEO
Should Internet Explorer be causing difficulty in viewing, perhaps bear in mind Mozilla "Firefox" as an alternative browser.
 ............
 ............
 ............
Thank you for taking the time to view this page. We hope it has been of interest
See also the OPERATING MANUAL the RANGE COURSE the ARMOURERS' INSTRUCTIONS
the ILLUSTRATED PARTS - back to BOYS A.T.R
Click here for Chronology of Enfield genre Training Rifles, Adapters & Cartridges